Wednesday, December 21, 2011

Christmas Shortbread Stars

Can you see the corner of the cardboard I used as a reflector? It didn't help much though. It was such an overcast day, I couldn't get rid of the shadows, so these photos are quite dark.

My kitchen is a flurry of action this week. I am busy baking cookies for the tradespeople who come to do work on our house. It would probably be easier to buy ready made cookies, but where's the spirit of Christmas giving in that??

Besides, how could I deny Miss Pantry the chance to "help" Mummy in the kitchen? She loves to pour ingredients into the mixing bowl and mix it all up with the whisk. It's a bit messy, but there's no time like the present to start including her in the kitchen. Being able to cook is an important life skill (in my opinion), and one that I want my children to have.


I've posted a shortbread recipe previously. This recipe is similar, except there's no egg. But I'll be honest, the dough is fiddly. At first I thought I'd never get the crumbly pieces to come together. But persistence, or rather sheer pig-headedness in my case does pay off. Just keep kneading, and the warmth of your hands help it stick.

Fiddly dough aside, these are the best homemade shortbread I have ever tasted. It is buttery as expected, but the crumbs are extremely fine, and the texture so light and delicate, it is almost powdery. Even Mr Pantry declared that "these are much better than the other shortbread and so easy to eat".


Eat them as they are, dust some icing sugar over the top, sandwich with jam, dip in chocolate, sprinkles, nuts, or whatever else floats your boat, but make sure you make them today!

And be warned. These are so yummy, it is hard to stop at one!

Recipe from Western Star.

Happy baking and Merry Christmas!


Wednesday, December 14, 2011

Teeth-Sticking-Plate-a-Licking Chocolate Caramel Slice

Such beautiful layers, don't you think? Who says brown coloured food is ugly?


Ah, dear readers. The things I do for you. In order to make my chocolate slice look presentable for photos, I trimmed off all the crusty edges. So that you can see the beautiful jaw sticking layers inside. And of course, one must not waste food, so I had to eat those off cuts. But I did it with you in mind. Really.

 Even the off cuts are beautiful.

This slice is sweeeeeet. Perfect for sharing with people you love durng Christmas. So make it! Believe me, everyone will love you that little bit more after tasting it.


As Miss Pantry would say, "All gone"!

Recipe from Donna Hay Modern Classics Book 2 and here.

Happy baking!


Friday, December 9, 2011

Smoked Ham and Cheddar Quiche

Miss Pantry's childcare was having their annual Christmas party for the children, and I volunteered to bring a quiche.


My lovely quiche, in all its goldeny glory.

The most time consuming part was making the pastry, my obsessive compulsiveness did not do well here. Trying to get the pastry the same thickness throughout and making sure I got a nice fluted edge was time consuming, not to mention complete insanity because I was just going to pour the filling over the top anyway!


Look! I spy a fluted edge!

Next time I might just buy some ready rolled shortcrust pastry to save time and spare my poor brain cells from self-combustion.


Parsley from my garden.

But don't let me put you off making the pastry for this scrumptious open-faced pie. Normally, I find kneading and rolling pastry quite therapeutic, but because I was making this for other people, I wanted to make a good impression (pun intended). The rest of the quiche was so easily assembled, a monkey could do it. Or your typical OCD Asian housewife like myself.


Recipe from Donna Hay Modern Classics Book 1.

Basic shortcrust pastry ingredients:
  • 2 cups flour
  • 145g butter
  • 2-3 tablespoons iced water

Method:
  1. Put flour and butter in food processor and whiz until mixture looks like fine breadcrumbs.
  2. While motor is running, add enough iced water to form a smooth dough.
  3. Knead lightly and wrap in plastic wrap. Refrigerate for 30 minutes. When ready to use, roll on floured surface to 3 mm thick and line your quiche dish/tart dish. 


Quiche ingredients:
  • 350g shortcrust pastry, above
  • filling ingredients from here
Method:
  1. Preheat oven 180 degrees C. Roll pastry as above.
  2. Blind bake pastry shell (baking paper over shell, add weights, bake 10 minutes, then remove weights and bake another 5 minutes) and set aside to cool.
  3. Reduce oven to 160 degrees C.
  4. Sprinkle pastry shell with ham, cheese and parsley. Whisk together eggs, cream, mustard, salt and pepper.
  5. Pour over filling and bake 40 minutes or until set.

Happy cooking!

Wednesday, November 9, 2011

Soba Noodles with Sesame Seeds

While I could slurp soba with no other accompaniments other than a bottle of soba dipping sauce, this version from Nigella's Forever Summer is pretty good too!


This dish cooks in no time at all. And except for the spring onions, everything else comes out of a bottle or a packet. Easy! 

Nom nom nom...

Miss Pantry loves these soba noodles. I use low sodium soy sauce because I don't want her to have too much sodium in her diet. Nor mine for that matter.

 
Couldn't wait, took a bite!

Recipe from here.


Monday, November 7, 2011

Weekend Pancakes

Saturday morning.

Still wearing pyjamas.

Eating home made pancakes.

Awesome.


I love my pancakes drenched in maple syrup. But in the absence of that, fresh fruit will do. Until Miss Pantry picked them off my plate one by one! Yes, while I was taking these photos!


I have never been able to get my pancakes to look like the ones you get in cafes. They always end up looking blotchy with uneven colouring. I wonder if it's because I use wholemeal flour? Or perhaps my pan is too hot/not hot enough? Anyone have tips for me?

 
Notice all the blueberries are gone? Yup, little fingers have struck!

Thursday, November 3, 2011

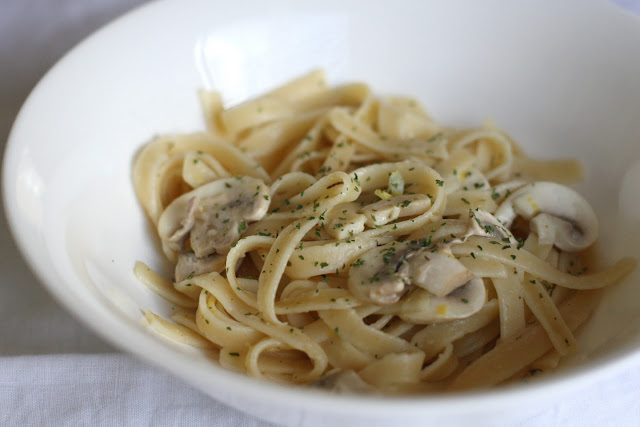
Fettucini with Lemon, Garlic and Thyme Mushrooms


This has got to be the easiest pasta dish I have ever prepared. Usually my pasta dishes are chock-a-block full of ingredients. Mince, prawns, chorizo, onions, vegetables etc etc (not usually all these at once). And lots and lots of sauce.

It was nice not having to do too much prep work beforehand. In any case, I did have a hungry toddler shouting "Dinnertime Mummy!" at me whilst I was cooking. So dinner had to be on the table pronto.


This dish uses the juice and zest of one lemon. I like my pasta savoury, and I wasn't sure how the lemon would complement it. So instead of the juice of an entire lemon, I used half.


Verdict?

Wowsers! This dish knocked my socks off! Its simplicity really shone through. Compared to the tomato based sauce laden pasta I normally prepare, this was light and refreshing. There were only a handful of ingredients, but they complemented each other so well. The lemony taste was mellow, perhaps next time I will juice the whole lemon for comparison.

I might also add that I didn't have any fresh herbs on hand, so I substituted with dried ones. And I didn't have the linguine that the recipe called for, so I used fettucini instead. And I didn't have the chestnut mushrooms, so I used button mushrooms. So you see, it's really a very versatile and forgiving dish. I reckon you could use penne or macaroni and it would still be good.

This dish will have to be on my menu rotation. Or at the very least, be added to my list of dishes I fall back on when I'm cooking for myself.


Recipe from Nigella Express
Ingredients:
  • 225g chestnut mushrooms
  • 80ml extra virgin olive oil
  • 15ml tablespoon Maldon salt or 1.5 teaspoon table salt
  • 1 small clove of garlic, crushed
  • zest and juice of 1 lemon
  • 4 sprigs fresh thyme, leaves stripped
  • 500g linguine (or pasta of your choice)
  • fresh parsley, chopped
  • grated Parmesan
  • freshly ground pepper

Method:
  1. Slice mushrooms and toss into a large bowl with the oil, salt, garlic, lemon juice, zest and thyme leaves.
  2. Cook pasta, drain it, then add it to the mushroom mixture.
  3. Toss everything well, then add parsley, Parmesan and pepper to taste.
  4. Serves 4-6.

Happy cooking!

Monday, October 31, 2011

Shortbread


These are my Mum's favourite biscuits. Crumbly, buttery shortbread.

However, would it surprise you if I said that Mum doesn't like butter? Nope, can't stand the taste, the smell, the texture. But give her a plate of these? And she just about inhales them.
I could never figure out why, because these biscuits are baked with almost the entire stick of butter (220g)!


These biscuits are fabulous with a cup of coffee. The rice flour gives it a nice crumbly interior, while the exterior holds its shape rather well. They are good travellers too. I would know, because these biscuits survived a plane trip in my suitcase. Yes, my suitcase, stored in ziploc bags no less. And they arrived at their destination looking just as unblemished as they were when I packed them.


Make these today, won't you?


Recipe from Donna Hay's Modern Classics Book 2
Ingredients:
  • 220g chilled butter, chopped
  • 2/3 cup caster sugar
  • 2 cups plain flour
  • 1/2 cup rice flour
  • 1 teaspoon vanilla extract
  • 1 egg

Method
  1. Preheat oven to 160ºC. Line trays with non-stick baking paper. Process all ingredients in a food processor until a dough forms.
  2. Place the dough on a lightly floured surface and knead gently.
  3. Roll tablespoons of dough into balls. Place on baking trays and flatten slightly with a fork.
  4. Bake for 22-25 minutes or until just golden brown.

Notes:
I used my KitchenAid mixer for this because my food processor is too small. First I creamed the butter and sugar, then added vanilla and egg, before adding the flours half a cup at a time.
Happy baking!

Thursday, October 27, 2011

White Chocolate Chunk and Cranberry Cookies

Somehow my cookies always end up stacked. It's the easiest composition, since I only take pictures while Miss Pantry is having a nap.


I have a sweet tooth. As if you didn't already know.

Every few days, I get the urge to eat something sweet. Oh who am I kidding? I get the urge for something sweet daily. So I turn to my stash of chocolate when the cravings strike. And before I know it, I'd have eaten half a slab and I'll spend the rest of the day feeling like a fat slob.

Only sometimes will I let the annoying thing called will-power get in the way. I think my butt subconsciously knows that too much chocolate is not good for it.


Well, here you go. Partially unstacked and with a ribbon. Wow.

Times like this, I curse that I am not blessed with super high metabolism or the skinny gene. Or that I don't look like Miranda Kerr - I have a secret crush on her. She's gorgeous and advocates a healthy lifestyle. And she drinks chlorophyll. It's supposed to help with something, cell regeneration or whatnot. I forget. Maybe I should drink chlorophyll, might help with memory.

So anyhow, in an effort to eat less chocolate/packaged cookies/store-bought-highly-processed junk, I figured I'll make my own sweet snacks. If I made them, then I get to eat them without feeling guilty, because I'll know exactly how much sugar or fat has gone into them. Right?

I know what you are thinking right now. You're thinking "this cookie has chocolate and processed sugar in it"! Yes, yes, you are right. And it does make this cookie decadently sweet. But you see, that is the key. Because it is sweet, one (or two) cookies will be enough to satiate my sugar cravings.

Ingenious isn't it?

Recipe adapted from Taste.com.au
Yields 32 cookies

Ingredients:
  • 125g butter, softened
  • ¼ cup caster sugar
  • ¼ cup firmly packed brown sugar
  • 1 egg
  • ⅓ cup rice flour
  • ½ cup almond meal
  • ¾ cup plain flour
  • ½ cup dried cranberries
  • 150g white chocolate, roughly chopped

Method:
  1. Preheat oven to 180ºC (160ºC fan forced).
  2. Beat butter and sugars until light and fluffy. Add egg. Beat until combined.
  3. Stir in flours, almond meal, chocolate and cranberries.
  4. Roll level tablespoons of mixture into balls and place 5 cm apart on trays. Flatten slightly. Bake for 12 to 15 minutes or until light golden. Cool for 5 minutes on trays before transferring to racks.

Happy baking!

Tuesday, October 25, 2011

Amaretti Amore


Gosh, it has been ONE YEAR since my last post. Is anyone still following this blog? I don't blame you if you're not.

To lure you back, here's a sweet incentive. These are extremely easy to eat! Crunchy on the outside, soft and chewy on the inside. With a subtle hit of almondy goodness. Ah, I'm in love.

Recipe from The Australian Women's Weekly cookbooks: Wicked sweet indulgences
Yields 20 biscuits

Ingredients:
  • 1 cup (125g) almond meal
  • 1 cup (220g) caster sugar
  • 2 egg whites
  • ¼ teaspoon almond essence
  • 20 blanched alomonds (20g)

Method:
  1. Line 2 oven trays.
  2. Beat almond meal, sugar, egg whites and essence in a small bowl with electric mixer for 3 minutes; stand 5 minutes.
  3. Spoon mixture into piping bag fitted with a 1cm plain tube. Pipe directly onto prepared tray in a circular motion from centre out, to make biscuits about 4cm in diameter.
  4. Top each biscuit with an almond. Cover trays of unbaked biscuits loosely with foil; stand at room temperature overnight.
  5. Preheat oven to 180ºC. Bake biscuits for 12 minutes or until browned lightly. Stand amaretti for 5 minutes then transfer to wire rack to cool.
Tip: Amaretti can be baked the day they are made, however, they will spread a little more. For best results, stand the unbaked biscuits overnight.

Happy baking!

~ Keep calm and have a cupcake ~