Thursday, July 5, 2012

Home-made Muesli Bars


Muesli bars are a healthy food, right? I suppose some are, if you buy the organic, reduced sugar, reduced fat ones. But have a look on the back of the pack. See those weird sounding chemical names? Or the names that come with numbers (like emulsifier 471)? Of course common sense would tell you that in order for a product to stay fresh for months and months on a supermarket shelf, food additives like preservatives will have to be added.

Which makes them not so healthy.

It's convenient buying muesli bars from the shops. I get it. I really do. I've done it myself. But once you've made your own muesli bars, chances are you won't buy them from the supermarket anymore. Besides it being cheap as chips to make your own, you can also vary the ingredients.

This recipe is really versatile. I've made it a few times, and each time the muesli bars are different. Play around with the ingredients. I don't have wheatgerm at home, so I increased the rolled oats quantity to 1.5 cups. I don't like too many sesame seeds, so I reduced the amount and topped it up with something else. Besides the sultanas, I've also tried other dried fruit like cranberries, apricots, apples, dates. All very yummy. Next time I will add flaxseed too. Or maybe chocolate chips if I was making them as a treat.

You could also add nuts, but I left them out because Miss Pantry's preschool has a nut-free policy.

One thing to remember though, you have to include the brown sugar and honey, to make the caramel that binds the ingredients together. Otherwise you'll end up with yummy muesli, instead of muesli bars, as I found out one time when I omitted most of the sugar.

After cutting into bars, I wrap each one in baking paper so they don't all stick together. And it's easy to grab-and-go. I cut each bar small, about half the size of the average muesli bar. I found this easier for Miss Pantry to handle, and it also reduces food wastage.

Recipe adapted from Taste.com.au
Prep and cooking time: Less than 30 minutes (longer if your 3.5 year old preschooler is helping!)
Makes 16 bars.

Ingredients:
  • 1 cup rolled oats
  • 1 cup desiccated coconut
  • 1/2 cup wheatgerm
  • 1/2 cup sesame seeds (I reduced to 1/8 cup)
  • 1/2 cup sunflower kernels
  • 1/2 cup pumpkin seeds (pepitas)
  • 1 cup sultanas
  • 125g butter (I reduced to 100g)
  • 1/2 cup honey
  • 1/3 cup brown sugar (reduced to 1/4 cup, which is just enough to help the muesli stick)

Method:
  1. Grease and line a baking pan with baking paper. Cook oats, coconut, wheatgerm, sesame seeds, sunflower kernels and pumpkin seeds over medium heat, stirring, for 8 to 10 minutes or until golden. Transfer to a bowl. Set aside to cool. Stir in sultanas.
  2. Cook butter, honey and sugar in a small saucepan over medium heat, stirring, for 3 to 4 minutes or until sugar dissolves. Bring to the boil. Reduce heat to low. Simmer, without stirring, for 7 minutes or until mixture forms a soft ball when a little is dropped into ice-cold water. Add to dry ingredients. Stir until combined.
  3. Spoon mixture into pan. Use a large metal spoon to press down firmly (I use a sheet of baking paper and press down with my hand to compact the muesli). Allow to cool. Cut into squares. Store in a foil-lined airtight container for up to 7 days.

Happy cooking!

Wednesday, December 21, 2011

Christmas Shortbread Stars

Can you see the corner of the cardboard I used as a reflector? It didn't help much though. It was such an overcast day, I couldn't get rid of the shadows, so these photos are quite dark.

My kitchen is a flurry of action this week. I am busy baking cookies for the tradespeople who come to do work on our house. It would probably be easier to buy ready made cookies, but where's the spirit of Christmas giving in that??

Besides, how could I deny Miss Pantry the chance to "help" Mummy in the kitchen? She loves to pour ingredients into the mixing bowl and mix it all up with the whisk. It's a bit messy, but there's no time like the present to start including her in the kitchen. Being able to cook is an important life skill (in my opinion), and one that I want my children to have.


I've posted a shortbread recipe previously. This recipe is similar, except there's no egg. But I'll be honest, the dough is fiddly. At first I thought I'd never get the crumbly pieces to come together. But persistence, or rather sheer pig-headedness in my case does pay off. Just keep kneading, and the warmth of your hands help it stick.

Fiddly dough aside, these are the best homemade shortbread I have ever tasted. It is buttery as expected, but the crumbs are extremely fine, and the texture so light and delicate, it is almost powdery. Even Mr Pantry declared that "these are much better than the other shortbread and so easy to eat".


Eat them as they are, dust some icing sugar over the top, sandwich with jam, dip in chocolate, sprinkles, nuts, or whatever else floats your boat, but make sure you make them today!

And be warned. These are so yummy, it is hard to stop at one!

Recipe from Western Star.

Happy baking and Merry Christmas!


Wednesday, December 14, 2011

Teeth-Sticking-Plate-a-Licking Chocolate Caramel Slice

Such beautiful layers, don't you think? Who says brown coloured food is ugly?


Ah, dear readers. The things I do for you. In order to make my chocolate slice look presentable for photos, I trimmed off all the crusty edges. So that you can see the beautiful jaw sticking layers inside. And of course, one must not waste food, so I had to eat those off cuts. But I did it with you in mind. Really.

 Even the off cuts are beautiful.

This slice is sweeeeeet. Perfect for sharing with people you love durng Christmas. So make it! Believe me, everyone will love you that little bit more after tasting it.


As Miss Pantry would say, "All gone"!

Recipe from Donna Hay Modern Classics Book 2 and here.

Happy baking!


Friday, December 9, 2011

Smoked Ham and Cheddar Quiche

Miss Pantry's childcare was having their annual Christmas party for the children, and I volunteered to bring a quiche.


My lovely quiche, in all its goldeny glory.

The most time consuming part was making the pastry, my obsessive compulsiveness did not do well here. Trying to get the pastry the same thickness throughout and making sure I got a nice fluted edge was time consuming, not to mention complete insanity because I was just going to pour the filling over the top anyway!


Look! I spy a fluted edge!

Next time I might just buy some ready rolled shortcrust pastry to save time and spare my poor brain cells from self-combustion.


Parsley from my garden.

But don't let me put you off making the pastry for this scrumptious open-faced pie. Normally, I find kneading and rolling pastry quite therapeutic, but because I was making this for other people, I wanted to make a good impression (pun intended). The rest of the quiche was so easily assembled, a monkey could do it. Or your typical OCD Asian housewife like myself.


Recipe from Donna Hay Modern Classics Book 1.

Basic shortcrust pastry ingredients:
  • 2 cups flour
  • 145g butter
  • 2-3 tablespoons iced water

Method:
  1. Put flour and butter in food processor and whiz until mixture looks like fine breadcrumbs.
  2. While motor is running, add enough iced water to form a smooth dough.
  3. Knead lightly and wrap in plastic wrap. Refrigerate for 30 minutes. When ready to use, roll on floured surface to 3 mm thick and line your quiche dish/tart dish. 


Quiche ingredients:
  • 350g shortcrust pastry, above
  • filling ingredients from here
Method:
  1. Preheat oven 180 degrees C. Roll pastry as above.
  2. Blind bake pastry shell (baking paper over shell, add weights, bake 10 minutes, then remove weights and bake another 5 minutes) and set aside to cool.
  3. Reduce oven to 160 degrees C.
  4. Sprinkle pastry shell with ham, cheese and parsley. Whisk together eggs, cream, mustard, salt and pepper.
  5. Pour over filling and bake 40 minutes or until set.

Happy cooking!

Wednesday, November 9, 2011

Soba Noodles with Sesame Seeds

While I could slurp soba with no other accompaniments other than a bottle of soba dipping sauce, this version from Nigella's Forever Summer is pretty good too!


This dish cooks in no time at all. And except for the spring onions, everything else comes out of a bottle or a packet. Easy! 

Nom nom nom...

Miss Pantry loves these soba noodles. I use low sodium soy sauce because I don't want her to have too much sodium in her diet. Nor mine for that matter.

 
Couldn't wait, took a bite!

Recipe from here.


Monday, November 7, 2011

Weekend Pancakes

Saturday morning.

Still wearing pyjamas.

Eating home made pancakes.

Awesome.


I love my pancakes drenched in maple syrup. But in the absence of that, fresh fruit will do. Until Miss Pantry picked them off my plate one by one! Yes, while I was taking these photos!


I have never been able to get my pancakes to look like the ones you get in cafes. They always end up looking blotchy with uneven colouring. I wonder if it's because I use wholemeal flour? Or perhaps my pan is too hot/not hot enough? Anyone have tips for me?

 
Notice all the blueberries are gone? Yup, little fingers have struck!

Thursday, November 3, 2011

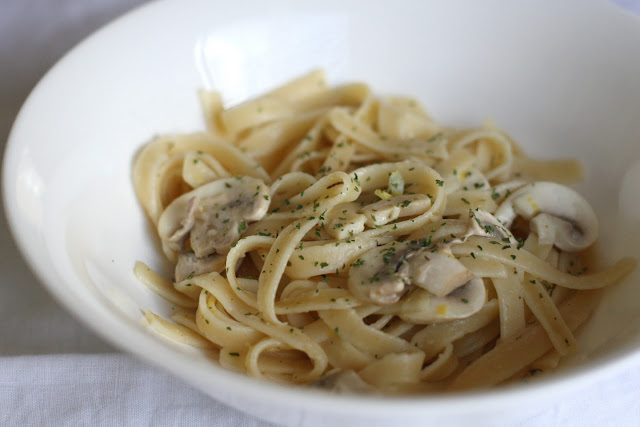
Fettucini with Lemon, Garlic and Thyme Mushrooms


This has got to be the easiest pasta dish I have ever prepared. Usually my pasta dishes are chock-a-block full of ingredients. Mince, prawns, chorizo, onions, vegetables etc etc (not usually all these at once). And lots and lots of sauce.

It was nice not having to do too much prep work beforehand. In any case, I did have a hungry toddler shouting "Dinnertime Mummy!" at me whilst I was cooking. So dinner had to be on the table pronto.


This dish uses the juice and zest of one lemon. I like my pasta savoury, and I wasn't sure how the lemon would complement it. So instead of the juice of an entire lemon, I used half.


Verdict?

Wowsers! This dish knocked my socks off! Its simplicity really shone through. Compared to the tomato based sauce laden pasta I normally prepare, this was light and refreshing. There were only a handful of ingredients, but they complemented each other so well. The lemony taste was mellow, perhaps next time I will juice the whole lemon for comparison.

I might also add that I didn't have any fresh herbs on hand, so I substituted with dried ones. And I didn't have the linguine that the recipe called for, so I used fettucini instead. And I didn't have the chestnut mushrooms, so I used button mushrooms. So you see, it's really a very versatile and forgiving dish. I reckon you could use penne or macaroni and it would still be good.

This dish will have to be on my menu rotation. Or at the very least, be added to my list of dishes I fall back on when I'm cooking for myself.


Recipe from Nigella Express
Ingredients:
  • 225g chestnut mushrooms
  • 80ml extra virgin olive oil
  • 15ml tablespoon Maldon salt or 1.5 teaspoon table salt
  • 1 small clove of garlic, crushed
  • zest and juice of 1 lemon
  • 4 sprigs fresh thyme, leaves stripped
  • 500g linguine (or pasta of your choice)
  • fresh parsley, chopped
  • grated Parmesan
  • freshly ground pepper

Method:
  1. Slice mushrooms and toss into a large bowl with the oil, salt, garlic, lemon juice, zest and thyme leaves.
  2. Cook pasta, drain it, then add it to the mushroom mixture.
  3. Toss everything well, then add parsley, Parmesan and pepper to taste.
  4. Serves 4-6.

Happy cooking!

~ Keep calm and have a cupcake ~